
Have you ever experienced when your team made a small change, and chaos resulted in production? You look through your logs, and your unit tests are all passing, but your real users are hitting a dead end. That feared feeling, that moment you realize your QA process is based on hope, not evidence. This is the type of problem we need to solve.
The reality is that relying on manual QA is not a good choice. But what if you could take the guesswork out of it? What if every single code change, feature addition, or bug fix was validated before your developers could merge? There is a difference when combining automatic test automation with GitHub Actions. And when you can amplify that with QA.tech’s AI-powered testing, you have a strong, reliable pipeline with detection of issues sooner and with limitless scale.
In this guide, I’ll walk you through how to set up your first automated workflow and extend it to make a robust test automation with QA.tech, and leave you with a set of great best practices along the way.
How GitHub Actions Transform Workflows?
For QA professionals, GitHub Actions is transformative because it offers you a single, centralized and dynamic repository for continuous quality assurance right next to your code (you don't need any other CI/CD tool set!). It also delivers great benefits to your pipeline:
- Seamless syncing with your code: Since your tests run alongside your code, there are no syncing problems or issues with authenticating with external providers, it just works.
- Flexible workflows: You can set up checks to prevent merges unless all tests pass, ensuring your
mainbranch remains healthy and stable. - Built-in Scalability: Need to test across environments or platforms? It manages running tests in parallel without a complex external setup.
Workflow Snapshot: For Experienced Developers
If you’re already familiar with GitHub Actions, here’s the core workflow structure you will be using. This basic pattern is the foundation for all test automation:
# The fastest way to run your tests in CI
name: Quick Test Run

on: [push, pull_request]

jobs:
  test:
    runs-on: ubuntu-latest
    steps:
      - uses: actions/checkout@v4
      - uses: actions/setup-node@v4
        with:
          node-version: '18'
      - run: npm ci
- run: npm testYou can now skip ahead to the Integrating with QA.tech for AI-Powered Testing section to see how we build upon this foundation.
Prerequisites Before You Start
To get started, you’ll need some knowledge on how to use GitHub, alongside the access to GitHub repository where you can add files. You should also have a basic understanding of GitHub Actions components:
- Workflows: These are YAML-configurable automated processes that will run one or more jobs when triggered by an event.
- Events: This refers to triggers like
push,pull_request, orschedule. - Jobs: A workflow is made up of one or more jobs, which run in parallel by default. ach job runs on a fresh instance of a virtual machine, also known as a runner.
- Steps: A job is composed of a series of steps. A step can be a shell command or an action (a reusable unit of code).
- Runner: This is a server that runs your workflows when triggered.
Step-by-Step Guide: Building Your First GitHub Actions Workflow
Let's kick things off by creating a simple test automation workflow.
Step 1: Clone the sample demo app.
We'll use a basic Node.js app in this example. If you want to follow along, you can clone our demo project.
git clone https://github.com/tarunsinghofficial/demo-reg-form.git
cd demo-reg-form
Run the app.
npm install
npm start
Visit https://qa.tech to see the registration form in action. Try registering a user and testing the validation (this is exactly what QA.tech's AI will learn to test automatically).
Step 2: Create a GitHub Actions workflow.
As we have seen earlier, a GitHub Actions workflow is defined in a YAML file. Inside your cloned project, create a .github/workflows directory and add a new file named test.yml:
# .github/workflows/test.yml
name: Node.js CI

on:
  push:
    branches: [ "main" ]
  pull_request:
    branches: [ "main" ]

jobs:
  build:
    runs-on: ubuntu-latest
    steps:
      - name: Checkout repository
        uses: actions/checkout@v4
      - name: Set up Node.js
        uses: actions/setup-node@v4
        with:
          node-version: '18'
      - name: Install dependencies
        run: npm ci
      - name: Run tests
        run: npm test
Let’s break down this code:
name: This is the name of your workflow.on: This is the event that triggers the workflow. For now, we’ve configured it to run on push and pull_request events on the main branch.jobs: Here’s the heart of the workflow. In our example, we define a single job named build.runs-on: This specifies the runner (the virtual machine where the job will execute). For the majority of use cases, ubuntu-latest is a great choice, as it’s a common Linux environment.steps: Next, we’ve got the sequential list of actions the job will take.actions/checkout@v4: This is a pre-built action that checks out your repository's code so that your workflow can access it.actions/setup-node@v4: This is another powerful action that sets up a Node.js environment on the runner. We're specifying version 18.npm ci: This command installs our project dependencies. We use npm ci (clean install) instead of npm install because it's specifically designed for automated environments, ensuring consistent builds.npm test: This is the command to run our test suite, which is defined in the package.json file.
After you've created and committed this file, push your changes to your GitHub repository. The workflow will automatically trigger, and you'll be able to see the results under the "Actions" tab of the repository.
When Should Your Tests Run?
The on section of the workflow determines when tests execute. You can follow the common strategies mentioned below:
# Strategy 1: Run on every push and PR (best for small teams)
on:
  push:
    branches: [ "main" ]
  pull_request:
    branches: [ "main" ]

# Strategy 2: Only on PRs (saves CI resources)
on:
  pull_request:
    branches: [ "main" ]

# Strategy 3: Conditional on file changes (best for larger projects)
on:
  push:
    branches: [ "main" ]
    paths:
      - 'src/**'
      - 'tests/**'
  pull_request:
    branches: [ "main" ]
    paths:
      - 'src/**'
      - 'tests/**'
Choosing the right testing strategy depends on your team size and project needs. Running tests on every push or PR is ideal for small teams, as it ensures continuous feedback without overwhelming your resources. On the other hand, opting to run tests on PR only results in less CI usage.
For larger projects, a path-based strategy can be especially efficient, as it runs tests only when relevant files change.
Integrating with QA.tech for AI-Powered Testing
The core issue with traditional test scripts is that they're fragile.
Let’s say you’ve put hours into writing a test that opens a form, fills it out, clicks "Submit", and verifies that the success message is there. Then, a designer changes the button text from "Submit" to "Register"; all of a sudden, the test breaks. Or, even worse, the test might still pass as long as the underlying HTML structure remains the same, even though the actual functionality is broken.
QA.tech solves all of this by understanding your application the same way a human user would. Instead of relying on hard-coded selectors, exact text, and similar, our AI observes user workflows, learns what that behavior looks like in your application, and creates tests that focus on functionality, not the implementation detail.
Now, we’ll focus on our user registration demo application to see how QA.tech‘s approach is fundamentally different.
Setting Up QA.tech Integration
Step 1: Get your secret credentials.
To integrate QA.tech into your workflow, you need two values:
QATECH_API_TOKEN: Your QA.tech API tokenQATECH_PROJECT_ID: Your QA.tech project ID
Simply sign up for QA.tech and create a new project. During the setup process, you may be asked to provide a test site URL; you can use your own deployed app (the one you’ve just cloned and deployed to any free web service provider like Render.com, etc.) or, this URL for demo purposes.
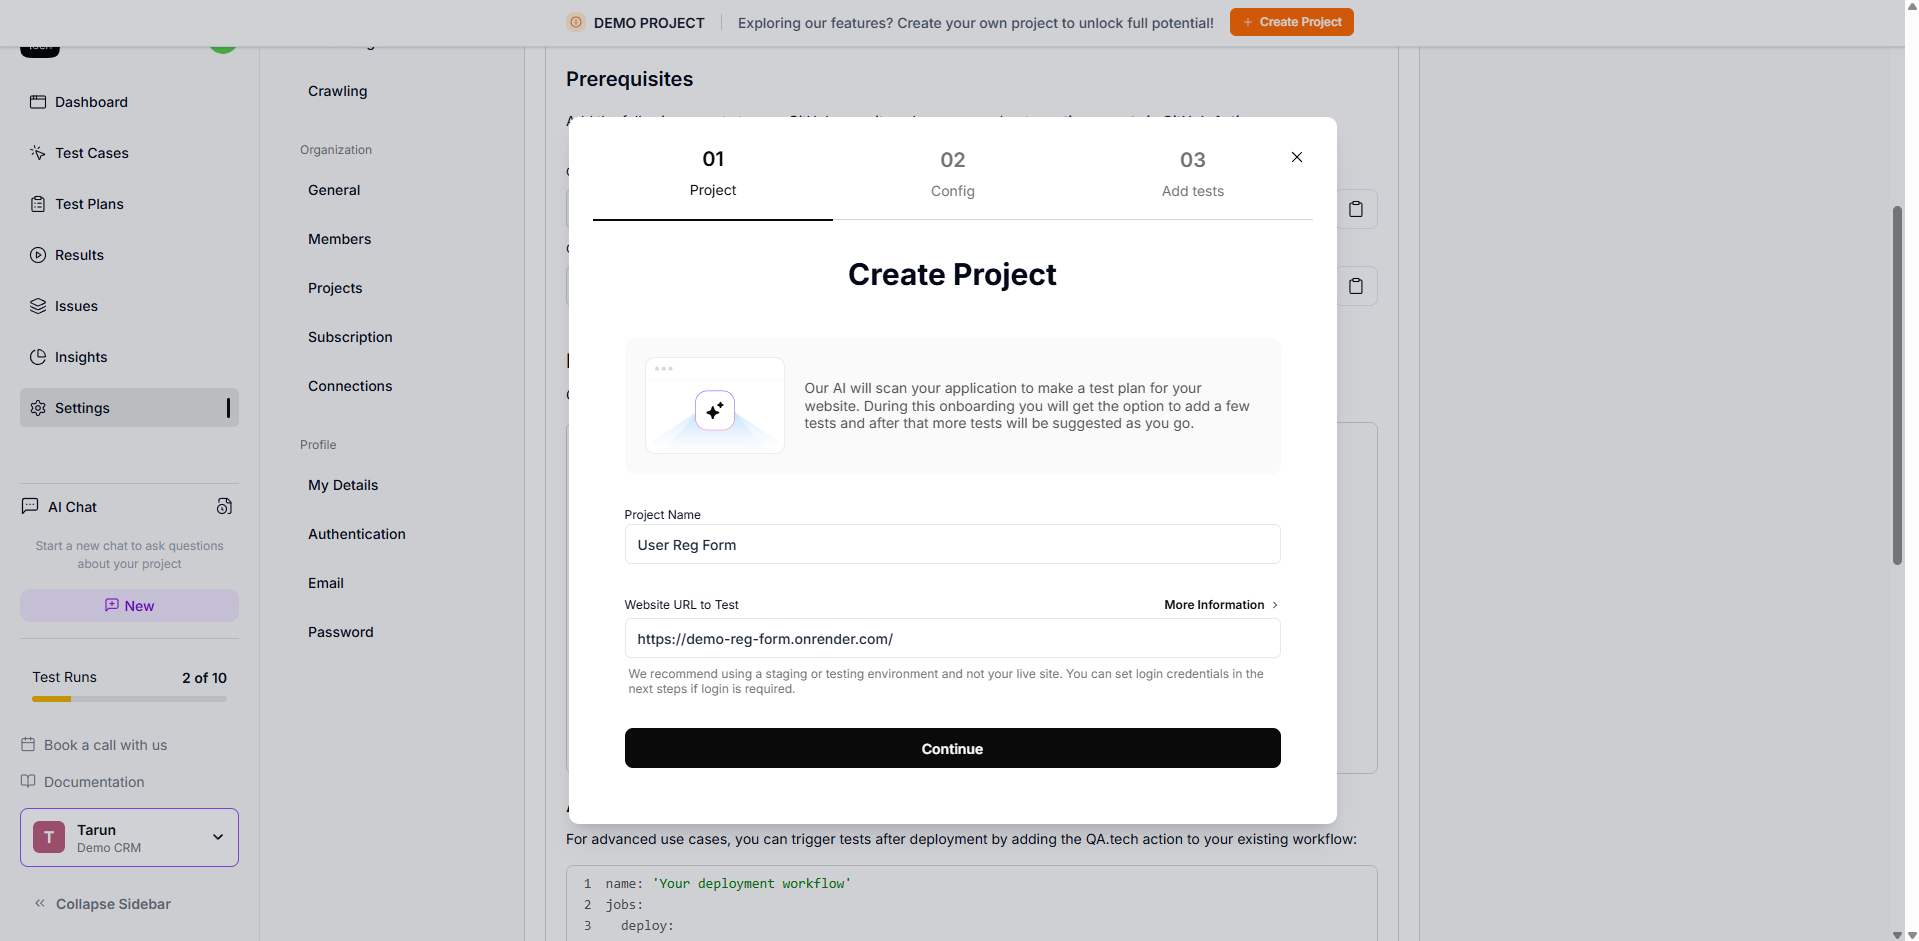
Once you’re done, you’ll find secret credentials in your project settings.
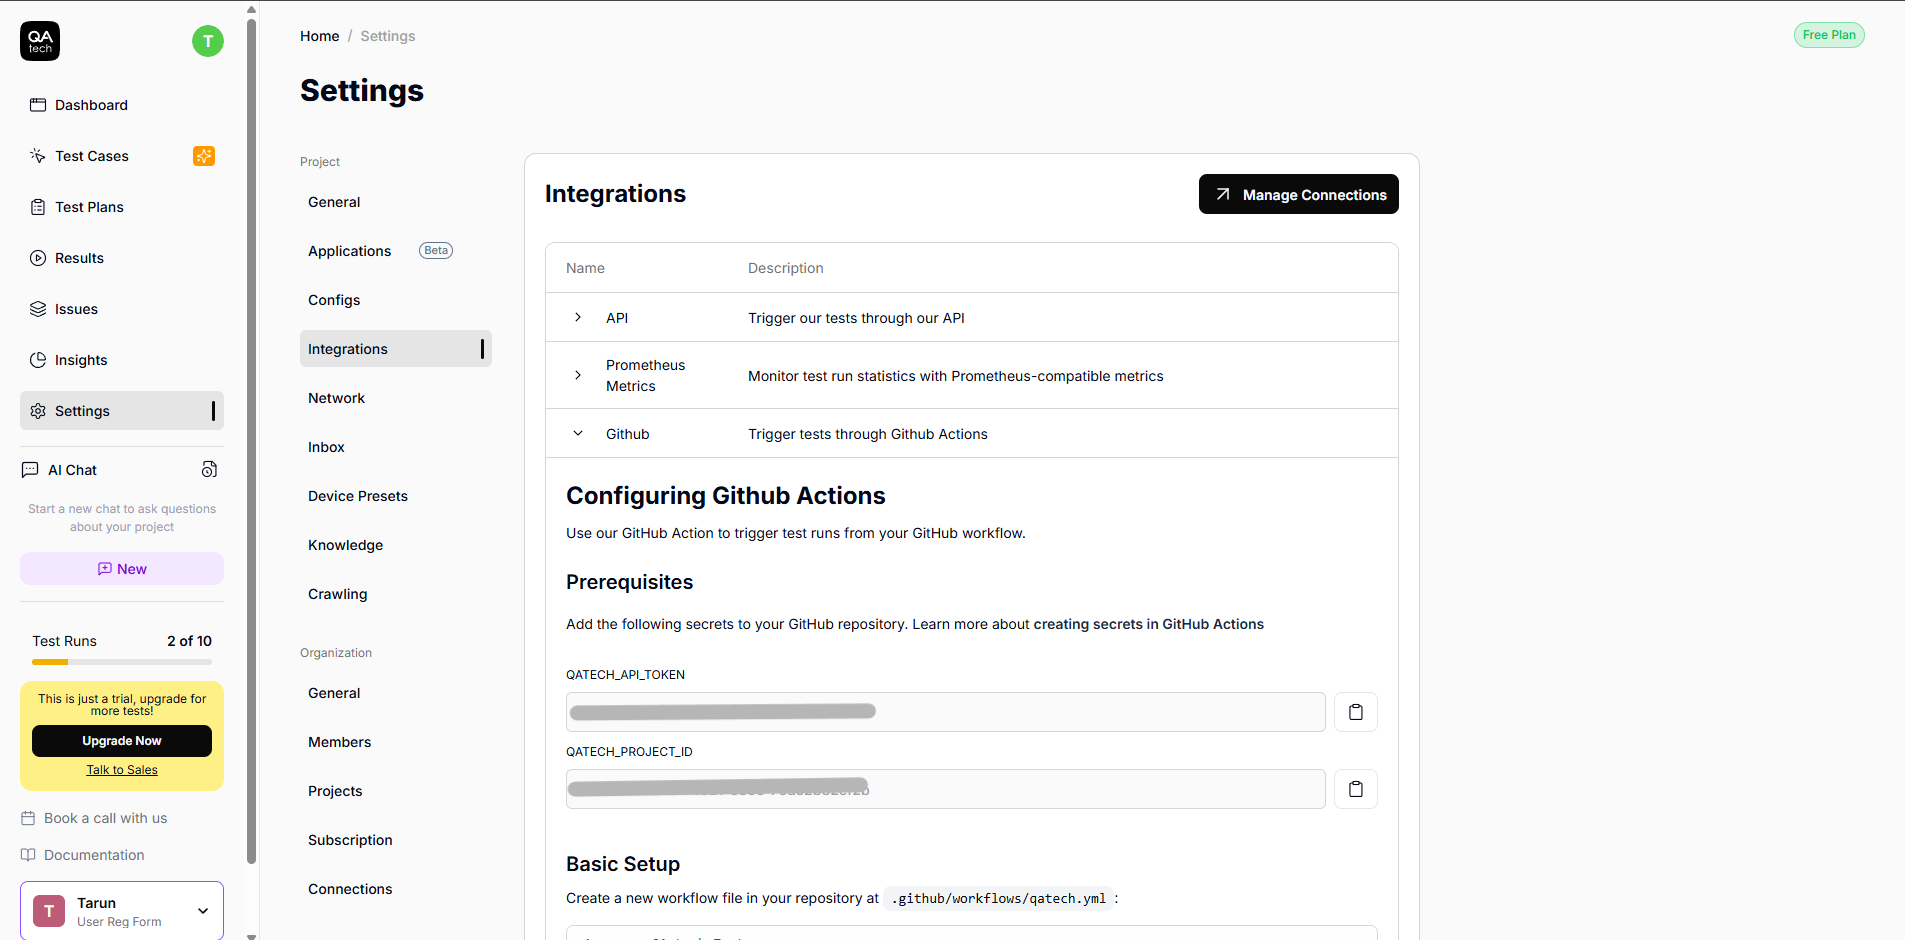
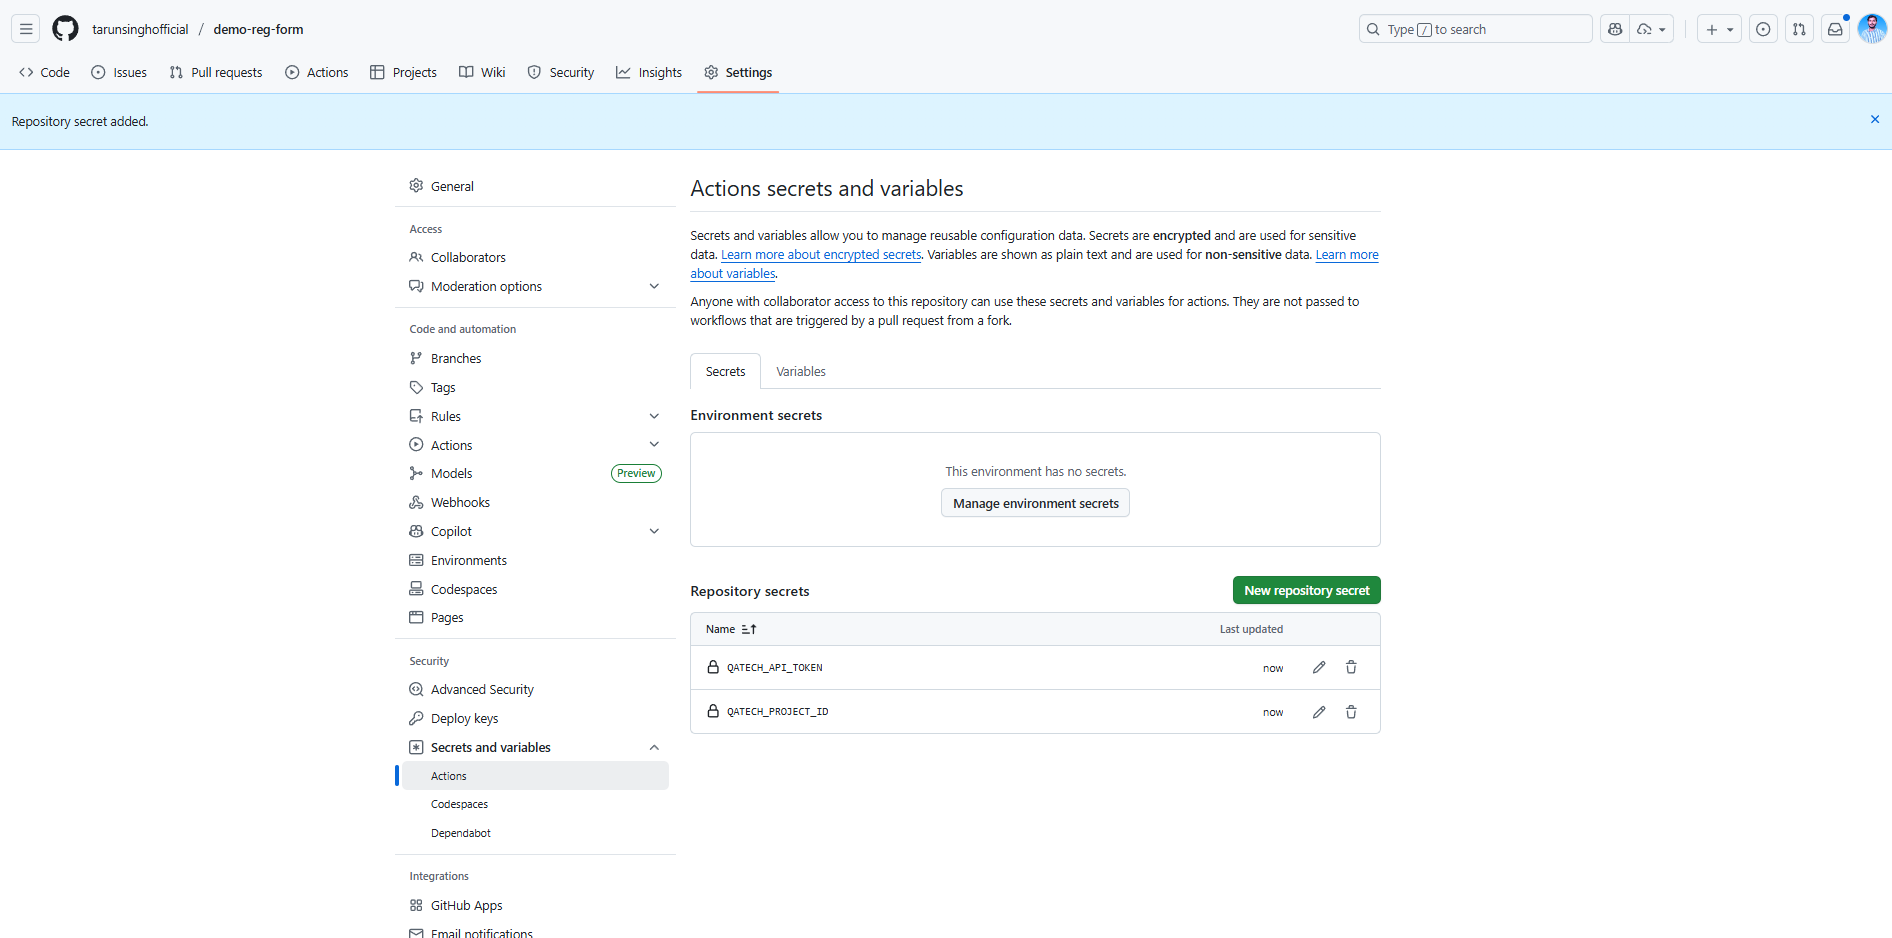
Warning: Never hard-code these values directly into your YAML file! Store them as GitHub Secrets instead. Here’s how you can do this:
- In your GitHub repository, go to
Settings>Secrets and variables>Actions - Add two new secrets:
QATECH_API_TOKENandQATECH_PROJECT_ID.
Step 2: Set up your workflow.
Now, let’s create our QA.tech workflow within the project.
Create a new file in the directory as .github/workflows/qa-test.yml, and add the YAML code mentioned below. This is the complete file that brings together both your unit tests and the QA.tech integration.
# .github/workflows/qa-test.yml
name: QA.tech AI Testing

on:
  push:
    branches: [main]
  pull_request:
    branches: [main]

jobs:
  # Run unit tests first
  unit-tests:
    runs-on: ubuntu-latest
    steps:
      - name: Checkout code
        uses: actions/checkout@v4

      - name: Setup Node.js
        uses: actions/setup-node@v4
        with:
          node-version: "18"
          cache: "npm"

      - name: Install dependencies
        run: npm ci

      - name: Run unit tests
        run: npm test

  # Run QA.tech AI tests on your deployed app
  qa-integration-tests:
    runs-on: ubuntu-latest
    needs: unit-tests

    steps:
      - name: Checkout repository
        uses: actions/checkout@v4

      - name: Run QA.tech AI tests
        uses: QAdottech/run-action@v2
        with:
          api_token: ${{ secrets.QATECH_API_TOKEN }}
          project_id: ${{ secrets.QATECH_PROJECT_ID }}
          blocking: true
          test_plan_short_id: "add_your_test_plan_id"
          applications_config: |
            {
              "applications": [
                {
                  "name": "default",
                  "url": "https://demo-reg-form.onrender.com" // or add your deployment url for testing
                }
              ]
            }

      - name: Upload test results
        uses: actions/upload-artifact@v4
        if: always()
        with:
          name: qa-tech-results
          path: |
            qa-tech-results.json
            screenshots/
          retention-days: 30
Let’s break down this workflow into two distinct jobs:
- unit-tests: You can look at this job as your first line of defense. It is used to run your tests and ensure that the basic code logic is sound. For now, it’s just configured to push or pull_request onto the main branch.
- qa-integration-tests: This is where the real magic happens. Notice the
needs: unit-testsline? This is a crucial dependency. It means this job will only run if theunit-testsjob is successful. This is a great practice for CI/CD, as it prevents you from wasting your time running full-blown integration tests on broken code.
The Run QA.tech AI tests step is where we call QA.tech into action. We pass our secrets, set blocking: true (which tells the workflow to wait for test results), and provide our test_plan_short_id and applications_config. The applications_config is a JSON object that tells QA.tech where to find your application so that it knows what URL to test.
Step 3: Run and view your tests.
Now, simply push your updated qa-test.yml file to the GitHub repository. You will see the workflow automatically kick off.
You can monitor the progress directly in your GitHub repository under the "Actions" tab. Here, you'll see both the unit-tests and qa-integration-tests jobs running.
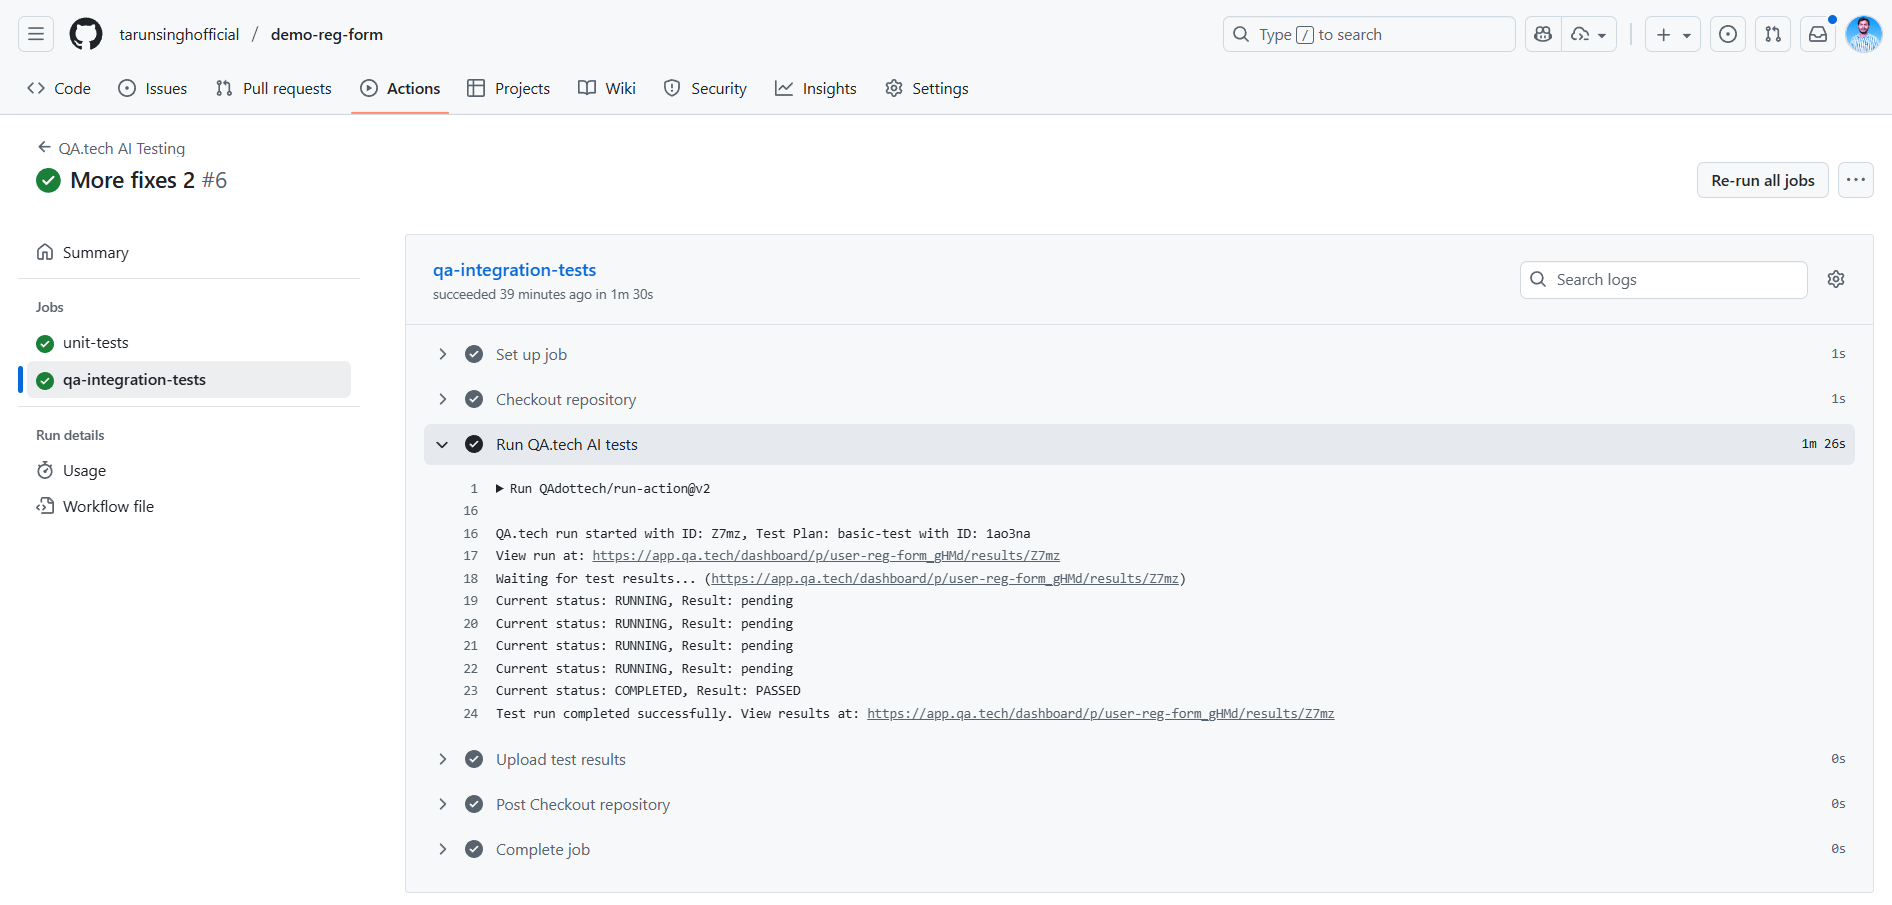
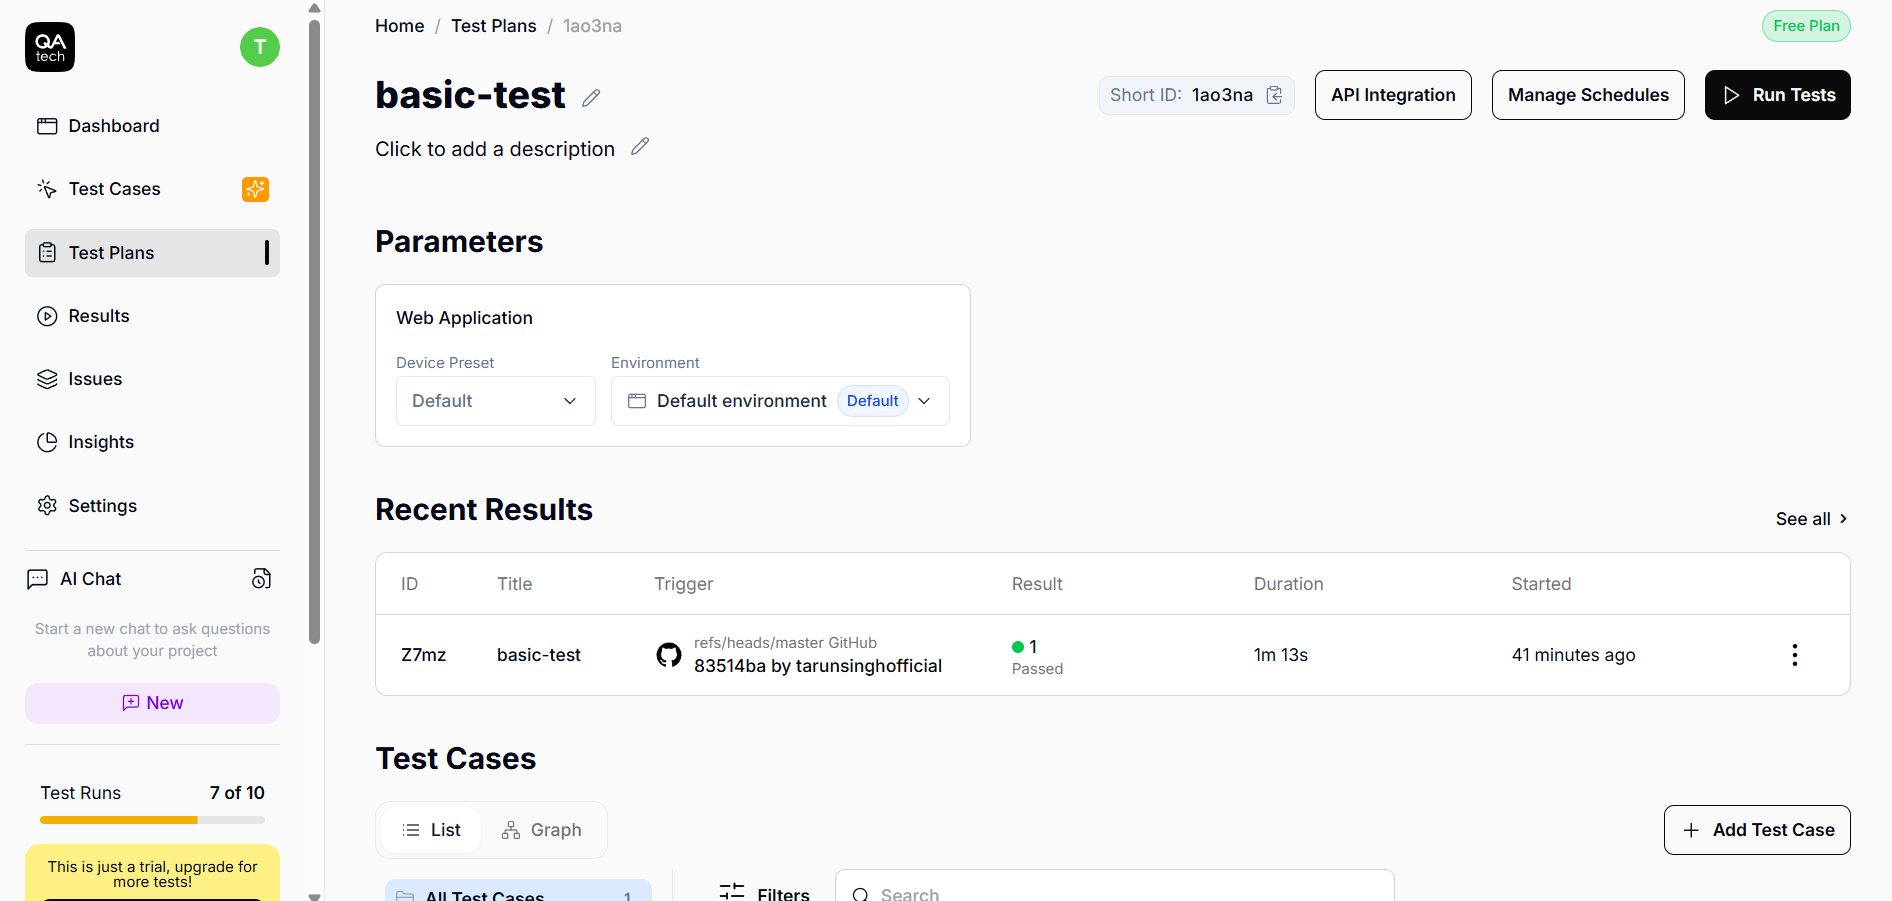
As the QA.tech tests start, you'll also notice a direct link in the logs that takes you straight to the test run on your QA.tech dashboard.
Click on that link, and you can watch as QA.tech navigates your application and executes the tests you've created in real time. When the job is complete, the status in GitHub Actions will update, and you'll get a clear pass/fail result. You can also view the detailed report, including screenshots and logs, right from the dashboard.
Advanced GitHub Actions Patterns for Robust Testing
Once you’ve had your basic workflow done, you can start leveraging more advanced patterns for building a robust testing pipeline.
How Conditional Workflows Work
At some point, you may want to avoid running jobs that aren’t required and may prefer a workflow to run only when a specified condition is met. In such cases, you can use the conditions to control job execution. For example, you might only want to run your test suite on the pull_request and branch being merged events:
on:
  pull_request:
    branches: [ "main" ]

jobs:
  e2e_tests:
    if: github.event_name == 'pull_request' && github.event.pull_request.head.ref != 'main'
    runs-on: ubuntu-latest
    steps:
      # ... your e2e test steps
Now, the if condition ensures the job only runs if the event is a pull_request , and the branch being merged isn't main itself. This way, redundant runs are prevented.
Parallel Test Execution
As your test suite expands, you may want to try running tests in parallel to save time. However, without the proper tools, things can get pretty complicated. You’ll need to separate your test into test files manually, create multiple parallel jobs, and figure out how to manage test runners and combine the results. This often results in flaky, hard-to-maintain pipelines.
That’s where QA.tech steps in. You don't have to manually split your test suite or configure complex matrix jobs in GitHub Actions. The QAdottech/run-action does the heavy lifting for you and distributes the test workload across multiple runners on our end. So, you get the benefits of parallel testing, such as faster feedback and more efficient use of your CI minutes, without the added complexity of managing it yourself.
Best Practices for a Robust Setup
Here are some top practices you should follow to get the most out of GitHub Actions:
- Test more often: CI/CD is a continuous process. Frequent testing leads to shorter dev cycles and faster releases, as we catch each bug early in every pull request or commit.
- Use secrets for sensitive data: Anything sensitive, such as API tokens, passwords, or signing keys, belongs in GitHub secrets. It should never be hard-coded in workflows.
- Make workflows debuggable: Your future self (and your teammates) will be grateful for clear logging and artifact uploads.
- Separate workflows: Use separate workflows for different types of tests. For example,
unit-tests.ymlis great for fast, lightweight checks, wherease2e-tests.ymlis a good choice for more extensive, slower tests that might run on specific branches or on a schedule. - Leverage caching: Caching can drastically speed up the workflows for larger projects with many dependencies. For example,
actions/cacheaction can cache yournode_modulesdirectory so that you don't have to reinstall everything each time.
Conclusion
GitHub Actions can help you go from a simple npm test command to a full-fledged, AI-powered test automation pipeline. By integrating QA.tech, you will move past the limitations of manual scripts and brittle selectors and adopt a more intelligent and resilient approach to quality assurance. At the same time, your team will benefit from faster feedback and reduced burden of test maintenance.
Ready to transform your QA process and boost your development speed? ? Get a demo to start today.